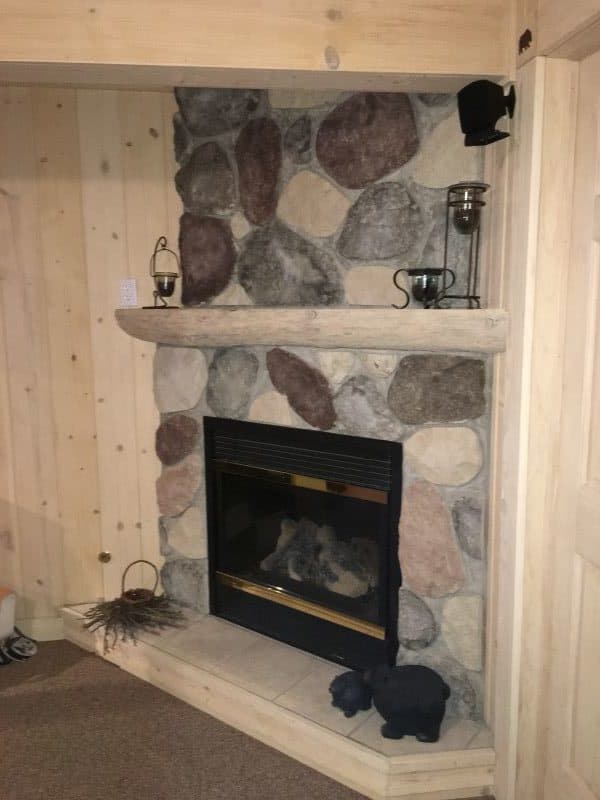
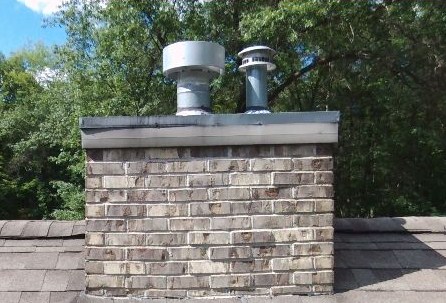
Have you ever wanted a brick chimney on a house without a real fireplace? Or how about fieldstone around a gas fireplace, but without the expense? Those were two things we wanted when we built our home several years ago. And they both are doable if you just learn how to install brick veneer products. It’s those types of finishing touches that can give your home that special look.
Your first thought might be a project like this is more than I can handle. Let me tell you, this is something you can do! All you need are a few tools, a little research, some planning and you can easily do this. It’s personally rewarding and your friends and family will be impressed.
Where Can Veneer Products Be Installed?
Table of Contents

Veneer brick and stone products can be applied to virtually any surface. On interior walls today there are several adhesive options available that allow you to install the veneer products directly to most surfaces, including drywall. Be sure to read the manufacturer’s instructions thoroughly when using these types of adhesives.
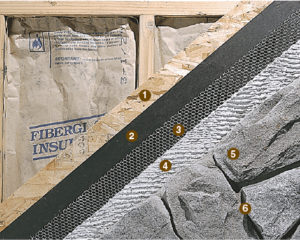
At the time we installed the stone veneer around our gas fireplace, a metal lath/mortar “scratch wall” was commonly used, if the surface was anything other than a masonry wall. The two projects you see here of ours were done in 1999, using the lath and mortar installation method discussed below. They both still look good today and are holding up well. There are many styles and colors to choose from, so I’m sure you can find one to suit you.
On exterior walls the lath and morter method is still used today when installed over plywood or OSB. The only difference is there are mortars available today with a polymer blends to make them more water resistance. You’ll also want to be sure to check your local building codes to make sure you get the proper overlaps on the vapor barrier.
Brick and stone veneer products come in all sorts of colors and styles today. I’m sure there will be something for everyone. However, back when we built back in 1999 there were not as many options available. So we had to take another approach.
For our chimney project, my wife had a particular brick in mind and we had trouble finding a veneer product to match. We ended up buying actual bricks, at a local masonry company and had them cut two, 1/2” veneers off from each brick. The cost may have been a little more, but because it was a smaller project it worked well for us. With so many choices today, I’m sure you’ll find something you’ll love. But if not, there is always this option to try.
How To Prepare The Scratch Wall

Depending on whether its an interior or exterior installation, the water/vapor barrier requirement may vary. Be sure to check the building codes in your area, it is important to ensure proper installation.
We installed our brick and stone veneer over tar paper, which was commonly used as the barrier with the metal lath installed over it. Today there are several choices to choose from. Just know that this vapor barrier is required and very important, especially when installing on exterior walls.
For best results you should start at the bottom and install the vapor barrier with at least a 4″ to 6″ overlap on the horizontal seams as your go up. All verticle seams should overlap by 6″ to 8″ and when going around corners, the barrier should extend at least 16″ from the corner.
When attaching the metal lath, orient it so when you run your hand down the wall, it’s rougher than running it up. This helps hold the mortar in place. Always wear gloves and safety glasses when cutting the lath. There are lots of sharp edges.
Galvanized nails, or non-rusting fasteners, should be used to attach the lath. Follow the veneer (brick or stone) manufacturer’s recommendation for the number of fasteners that should be used to attach the lath to the wall. This is very important, as this is what will support the weight of the mortar and veneer products.
Working with mortar can be messy, so be sure to wear a pair of safety glasses and put down some drop cloths. Mortar and cement can dry your hands out too, so it’s recommended to wear a pair of gloves too. Be sure to follow the mortar manufacturer’s instructions for mixing mortar.
Trowel the mortar onto the lath, making sure to work it into the lath. When finished there should be approximately 1/2” of mortar. After the mortar has begun to set up, use a stiff-bristled brush to “scratch” horizontal line across the entire surface. This will help the mortar on the veneer products to adhere better. Allow the wall to cure for at least 24 hours.
Preparing the Veneer Products

The key points from our projects were to lay-out and pre-fit your materials. With the brick, start at the corners and work in from both ends to the middle. Be sure to stagger the seams and keep things uniform.
For the stone, it’s like a jigsaw puzzle. Lay it out; trying to fit the different sizes and colors of stone randomly. We actually laid a couple of large pieces of cardboard on the floor and mark out the dimensions of the fireplace and wall on it. We then fit the pieces on it before starting. It worked great! It helps to be a little artistic doing this; thank the Lord for my wife!
Some of the pieces will need to be cut to fit. For some of the brick products, a hammer and masonry chisel can be used. I would recommend investing in, or borrowing, a tile saw with a diamond bit blade. They are not overly expensive and can be used on countless other projects around the house.
A 4” angle grinder, fitted with a diamond blade, is great for making small cuts on tight-fitting pieces. When using any of these power tools always wear eye and hearing protection. The saw can make a bit of a mess and the hand grinder will generate a lot of dust, so you should wear a dust mask and make your cuts outside. You may want to read my article on wearing personal protective equipment. It has some good suggestions for home project safety.
How To Install Brick Veneer Or Stone Products

Mix the mortar per the manufacturer’s instructions. When applying the mortar to the veneer products be sure to moisten the veneers and the scratch wall with a spray bottle or a damp sponge. This will help prevent them from absorbing the water out of the mortar and help make sure they adhere properly to the scratch wall.
Be sure to space the veneer products per the manufactures recommendation. This will allow for proper grouting between the veneer products and a uniform look. Allow the mortar to cure for 24 hours before grouting.
If you’re using an adhesive to attach the veneer products, be sure to follow the manufacturer’s instructions. Allow the adhesive to fully set before grouting.
How To Grout The Seams
Mix the mortar per the manufactures recommendations. It’s typically mixed somewhat thinner, so it can be applied using a “grout bag”. Simply fill the spaces between the veneer products, with the grout bag, and smooth it out using a “joint” tool. Try to avoid getting the grout on the face of the veneer product. It makes clean up much easier.
Once the mortar has firmed up, brush the joints with a clean, stiff bristle brush to remove loose material. A damp sponge can be used to clean excess mortar off the veneer product before it completely dries. Be sure to rinse and clean the sponge frequently.
The tools listed below are what you’ll need for this type of project. I’ve included a few optional tools that can make things go easier. Some of these tools can be used on many different projects, so consider that when trying to decide whether to purchase them. We’ve used them on tile floors, tiling a shower and on kitchen backsplashes. So keep checking back with us to see these projects in the future. We would also love to hear how your projects went too, so please leave comments.
I’ve added some links to some of the tools below, where you can get additional information and pricing. It can also be a convenient way to purchase many of these items too. And as always, I want to fully disclose that if you were to purchase any items when using these links, I may earn a small commission at no extra charge to you. This helps support our website so we can continue to provide free content for all our readers (thanks!).
Tools Needed To Install Veneer Stone

Tin Snips – Cutting metal lath
Hammer – Nailing lath and to use with a chisel
Masonry chisel – Chisels work and are a less expensive option for trimming masonry products, but are nowhere as precise as using power tools equipped with diamond blades. I highly recommend using power tools with diamond blades. FYI, don’t let the “diamond” blade scare you off. You’ll see below they are quite affordable and I’ve used the same blades on multiple projects.
Level – Important for veneer brick installation. Use to keep bricks nice and level as you go.
Trowels – Brick and Notched/Flat – Used for spreading and working with the mortar.
Joint Tool – Smoothing grout joints
Grout Bag – Applying grout to seams
Brush – stiff bristles for “scratching” and cleaning joints
Sponge – Smoothing grout seams and cleaning veneer stone
Tile / Masonry Saw – Diamond blade – This will not only work for cutting veneer masonry products. It will work for any floor tile or backsplash project. Check out our Kitchen Update Project for a little inspiration.
4-1/2″ Angle Grinder – Equipped with a 4-1/2″ diamond blade. If you’re considering buying a cordless angle grinder, you may want to read our article on Cordless Power Tools. It contains information on what to consider before making the investment.
If you have any comments or questions, you can leave them in the comments section below or you can email us at [email protected]. FYI, we do not collect or share email addresses. We will only use them to reply to your comments or provide answers to your questions. We are also required to let you know that some of our links are “affiliate links”. This means if you click on a link and make a purchase, we could make a small commission, at no extra cost to you. This helps offset the cost of maintaining our website. So, if you like what you’ve seen, please be sure to give us a “Like” and “Share” on Facebook and Instagram too. Thank you for reading and good luck with all your home projects!


I’m glad you found it helpful!
The guide on using veneer stone for brick projects is very helpful. I appreciate the clear tips and ideas, and I’ll definitely keep this in mind for my next home improvement.