One of the worst things a homeowner can face is the dreaded roof water leak. It can lead to all kinds of damage inside the home if left unchecked. The good news is you can make a shingle roof water leak repair themselves. It only takes a few basic tools, a little research, and a few hours of your time. And you can save hundreds of dollars in the process.
Damage to your shingle roof can come in several forms. High winds can tear shingles off or break them. Tree branches can fall and punch through a roof. Even a branch as small as two inches in diameter can do this. I’ve had it happen. Other causes are improperly installed roofing materials and of course winter ice dams on the eaves. It’s always a good idea to keep an eye on your roof and address any potential issues quickly.
As with any home project, knowing your limitations is very important. If you don’t like heights, this type of repair may not be for you. Other considerations are the complexity of your roof. Do you have multiple roof lines coming together? Is there a chimney involved in the repair? Getting the proper flashing around chimneys can be tricky. How steep is your roof? Steep roofs can be dangerous and require special safety equipment. If any of these situations exist, you may want to hire a professional roofing contractor. At a minimum, be sure to do additional research for any of the above-mentioned scenarios.
In this article, we will be providing you with a few links to some products for pricing and informational purposes. We are required to let you know some of these links are “affiliate links”. This means if you click on a link and make a purchase, we could make a small commission, at no extra cost to you. This helps offset the cost of maintaining our website. Now, let’s get started.
Roof Repair Safety Tips
Table of Contents
The shingle roof water damage repair made in this article was on a low pitched roof and mainly confined to the first few feet above the eaves. I was able to do almost all the work from a scaffold and an eight-foot ladder. I was also fortunate enough that my work surface below was level concrete, so both the ladder and the scaffold were very secure. A solid, level work surface is very important.
When working from heights, here are a few important details to consider. Thousands of people are injured every year from falls! If you’ve ever visited our website before, you’ll know our mission is to complete DIY home repair projects safely. It’s with that motive in mind that I’ve written several articles on safety-related topics. Two of those articles apply specifically to a project like this. The first article is about safe ladder use. It covers selecting and using the right ladder and all the dos and don’ts.
The second article is on basic fall protection. If you are working at a height greater than 6 feet, you should read this article. It offers some information on how to protect yourself from falls. This is very important when working on steep roofs or near the roof’s edge. I encourage you to take the time to check out these articles and take all the necessary precautions to protect yourself.
Roof Water Leak Sheathing Damage
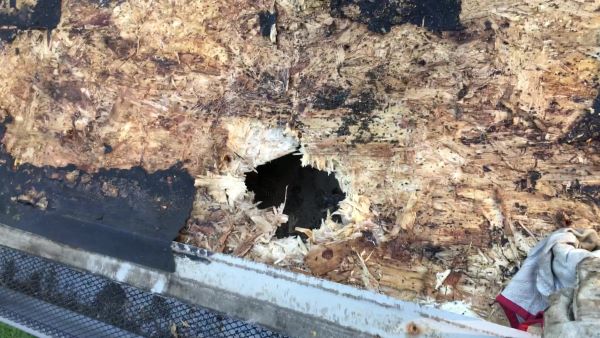
The roof damage I cover in this article was mainly due to ice dams on a low pitched roof. It began two winters earlier when I saw signs of a small water leak from the soffit area under my eaves. I mistook it for a leaking rain gutter. I used a little silicone and touched up a few suspect spots. However, this past winter the leak was much worse.
When spring rolled around I could actually see where the shingles were sagging a little in a couple of places. Upon further investigation I could tell the roof sheeting underneath the shingles had become wet and was badly damaged. I knew it was going to have to be repaired.
I made a couple of calls to some local roofing companies and it was either outside of their service area – I suspect the job was too small – or they wanted to install a new steel roof on the entire house. It was at this point I decided to take on the repair myself. I’ve made a few shingle roof repairs over the years, so I understood the basics and felt comfortable taking on the job.
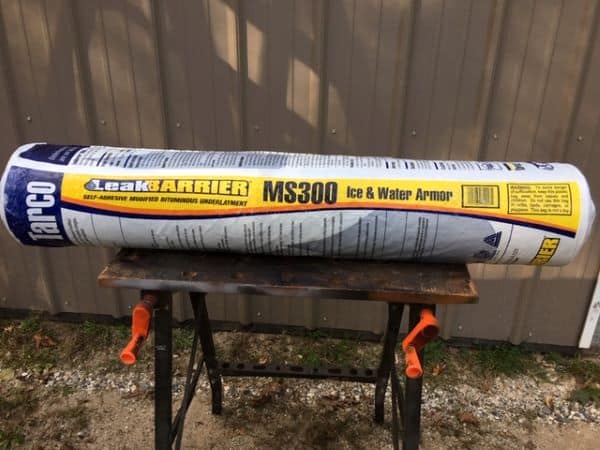
Being prepared is the key to any successful home project. With that in mind, I did a little research and confirmed that an “ice and water shield” material is required on the eaves area in the state of Michigan code. So I will definitely be incorporating that into my repair
Materials Needed For Shingle Roof Water Leak Repairs
Below is a list of the materials I put together to complete the job. Most items are pretty self-explanatory, but I’ll add a few comments to clarify things as we go. I’ve also included a link to the Lake Orion Roofing companies website. They have a good roof anatomy diagram for reference. It will help with identifying all the different parts of the roof and the materials used.
Also, make sure you buy plenty, of the required materials. It’s always good to have a little extra on hand for surprises. You can always take it back if you don’t need it. The time you save by not having to run back to the store is very important. If you’re renting tools like scaffolding or nail guns this could incur extra costs. Or maybe you’ve hired someone or asked a friend to help. That extra time will cost you extra and could cause some frustration with everyone involved. Research and being prepared will make the job go much smoother.
Roof Sheathing
Roof sheathing sometimes referred to as sheeting or decking typically consists of plywood or OSB board. The thickness is usually dependant on the rafter spacing. For rafts 20” on center, you can use 1⁄2” sheeting. If your rafters are 24” on center, then ⅝” sheeting should be used. I recommend gently prying up the drip edge in an area that is less visible from the ground to get a measurement of the sheeting. That way you can match what’s already there and buy the material ahead of time.
Underlayment
An underlayment layer is required between the roof sheeting and the shingles. This is typically a material like tar paper, but there are other commercially made materials more commonly used today.
Ice And Water Shield
This product is a waterproofing membrane that is required in many “snow belt” states to prevent damage from ice dams. It is also required in many states that get ravaged by hurricanes as well. This membrane is usually self-adhering and helps prevent backed up or windblown water from getting in. In most new installations it should (sometimes required by code) be installed on rake and eave drip edges, roof valleys, and possibly other special roof features.
Shingle Starter Strip
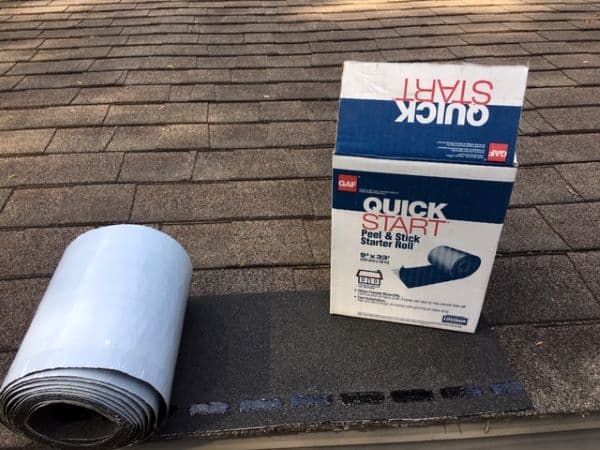
Many shingles, such as a “three-tab shingle”, have openings in their lower edge that goes over the shingles in the course below them. However, the first course of shingles at the eaves drip edge does not have any shingles below them. A starter strip is required to be installed before the first course of shingles can be installed. Many contractors simply install the first row of shingles upside down. The topside of all shingles are solid and have been used for many years in this way. Then they place the normal first course of shingle directly over them, being sure to stagger their seams. Today there are commercially made starter strips that work well. The top side is rugged enough to face the weather and the underside is self-adhering.
Shingles
the best case is to use matching shingles for the repair. Be aware that occasionally this is not possible and you’ll have to find something as close as possible. Any shingle is better than no shingles or damaged shingles.
Roofing Tar/Patch Material
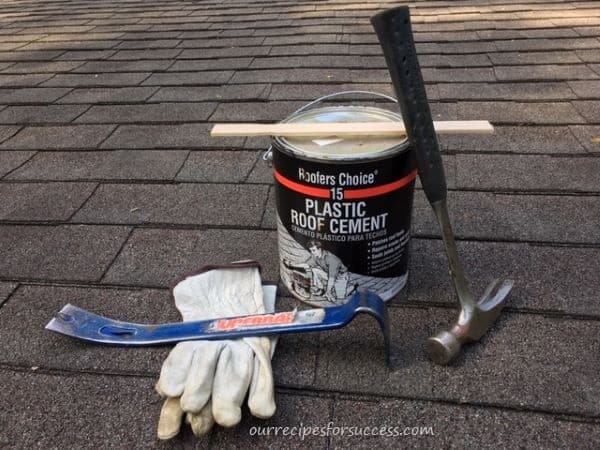
When making roof repairs having a roofing patch material is essential. It’s normally used during new installations around sewer vents, attic vents, and other roof penetrations. During repairs, it’s especially important for sealing underlayment on puncture type damage and for sealing old nail holes if you are reusing shingles.
Paint Stir Sticks
These work great for apply roofing tar. They’re stiff enough to scoop up the tar and thin enough to reach up under the shingles. And there’s no messy cleanup.
Nails
Roofing nails should be corrosion resistant. Many are galvanized coated or made of aluminum. For my 4’ by 17’ project I estimate I used roughly 200 nails, so be sure to have plenty on hand. Sheeting nails should be at least an 8d nail, 2” to 2-½” long and installed every 12” on center. In high wind areas, the spacing should be closer.
Tools Needed For Shingle Roof Repairs
You may be surprised at just how few tools it takes to make this type of roof damage repair. If you’ve read our articles on the basic toolkit for homeowners and carpentry tools for homeowners, all the hand tools listed below are included in one of these two lists.
Shingle Roof Water Damage Repair
Once you have all your materials and tools and are ready to begin, there’s one more thing to check before beginning a shingle roof repair. What is the weather forecast for the next day or two? With the shingles removed, your home is vulnerable to rain.
A nice warm day is good for working with the shingles themselves. However, if it’s too hot the shingles and other roofing materials can reach high temperatures and it makes for very harsh working conditions.
Another consideration is wind. You could be working with large sheets of wood and underlayment material that can be difficult to handle in the wind. Couple that with working at heights and it can make for a dangerous situation.
If at all possible, look for a few days when the temperatures are warm, not hot, and has a few clouds. And there’s no rain or winds in the near future. The warm temperatures will help with loosening and remove the shingles without doing damage. The no or low winds will make working with the underlayment much easier.
Shingle Roof Repair Steps
If you’re making a repair to a damaged roof, that means you will have to remove some shingles. Some of those shingles you may not have to worry about damage during removal, but eventually, you’ll need to remove some nails and shingles without damaging them around the repair site. Below is the information on how to do this and the steps to follow to make a quality roof repair.
The first step in this process is understanding how shingles are actually attached to the roof. When the first row, or course as it’s referred to in the roofing business, is laid on the roof they are nailed a little above the centerline of the shingle. Typically it’s just above the small patches of tar on the shingles. When the next course of shingles is laid on top it covers the nails and the tar patches on the shingle below. It is then nailed like the first course. However, this row of nails, if placed properly, should also hit the top of the first course of shingles laid. That means each shingle should have two rows of nails in it. This is very important to properly secure a shingle roof. But it makes it a little challenging to remove a shingle.
How To Remove Shingle Nails
To remove shingles without damaging takes a little finesse. You must start by freeing, or loosening, the shingles from each other. The small tar patches on each shingle should have helped stick the shingles together after installation. Using your flat bar or putting knife gentle work along the leading edge of each shingle loosening the shingle from the one below. Take care not to pry up too much or the shingle can tear. If you tear a shingle, you may want to replace it.
Loosen all the shingles that will need to be removed using this technique. You must also loosen at least one row of shingles above the shingles that need to be removed so you can access the nails. These nails will be in the top edge of the shingle that needs to be removed.
To remove the shingle nails you will need a flat bar. Its design makes it perfect for sliding under shingles to remove nails. By lifting the shingles on top of the shingle(s) to be removed you should see 5 or 6 nails holding the shingle. Keeping the flat bar tip flat, slide it under the shingle up to the nail and firmly push it under the nail head, with the shingle between the nail head and the flat bar.
Gentle pry up on the shingle and nail. Make sure that both the nail and the shingle are lifting together. If the nail is not coming up with the shingle, stop immediately! This could rip the nail head through the shingle. Reposition the flat bar forcing it firmly under the nail head and shingle until the nail starts to rise.
Once the nail comes up a ¼” remove the flat bar from under the shingle and use it to separate the nail head and the shingle on top. Now pry up with the flat bar to remove the nail. Continue on until all the nails are removed on the shingle and it should slide right out.
Below is a short video demonstrating how to remove the nails from shingles using the above steps.
I’m not 100% sure what the experts recommend, but it’s been my experience to start above the damaged area and work down. If you’re just replacing a damaged shingle or two, then removing the nails in and above the damaged shingles is all you need to do. If you need to make a much larger repair, I like doing it this way because once you remove a shingle all the nail heads in the shingles below it are clearly visible and makes it much easier to remove.
Once you get the feel of it, you will be surprised how quickly the nails and shingles come out. I’ll warn you now, you will occasionally pop a nail head through the shingle. It’s not the end of the world. The nail holes will be covered by the shingle above, but you will want to apply some tar over the nail hole.
It’s also a good idea to stack any of the shingles you plan on reusing well off to the side or well above your work area. This is to make sure you don’t have to relocate them if the work area needs to be enlarged.
How To Replace Roof Sheeting
If you have water damage like I did, and need to replace some of the roof sheeting, be sure to remove all the damaged material. Water can “wick”, or soak into the wood well away from the location of a water leak. By removing all suspect material around the leak area, you can have a better feeling about taking care of the issue.
To begin mark the area around the damaged sheeting to be removed using a carpenter’s pencil or a chalk line can be used for larger areas. Try and keep all the corners and edges straight, square and plumb. This makes it much easier for cutting and fitting the replacement sheeting. You need to have the ends of your sheeting patch centered on the rafters for support.
I recommend cutting the underlayment or tar paper along this line as well. Try to keep as much of the underlayment intact up to the edge of the sheeting being cut out. It’s also good to remove the shingles at least 1 foot above the cut-out. This will help properly install the new underlayment in the repaired area. We’ll cover this more a little later.
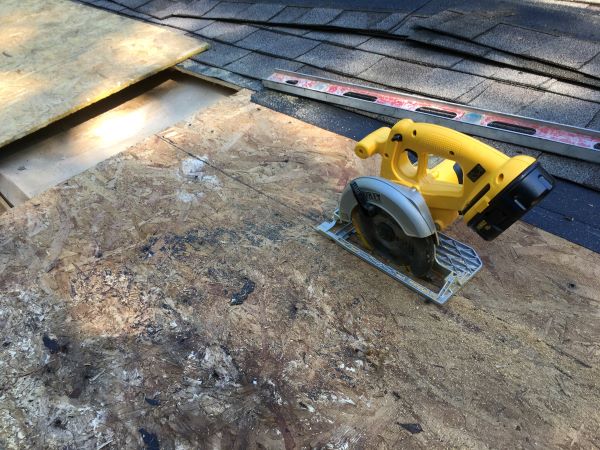
To cut the bad sheeting out adjust the depth of your circular saw blade so that it just cuts through the sheet. It should only leave a little make on the rafter underneath. Cutting too deep into the raft could weaken it so be careful.
Note: be sure to check for nails holding the sheeting before cutting. Hitting a nail with your saw can damage the blade and cause flying metal debris.
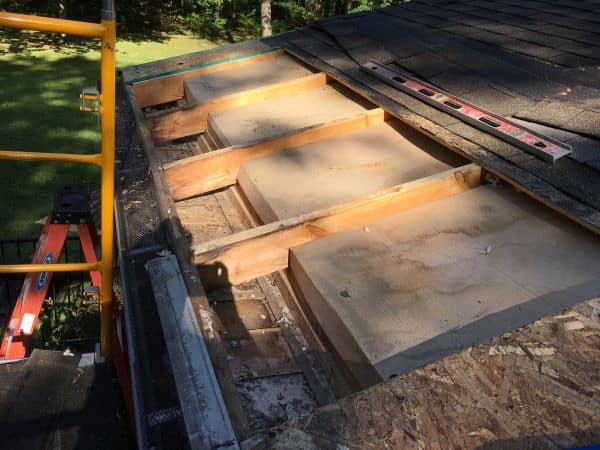
After the sheeting is cut, you may need to pry it out using a hammer and your trusty flat bar. Once the damaged sheeting is removed check the rafters for signs of physical or water damage. If you find any potential issue, consult a reputable building contractor for assessment and repairs. Then simply cut your replacement sheeting to the exact cut out dimensions, install it and nail it to the rafters.
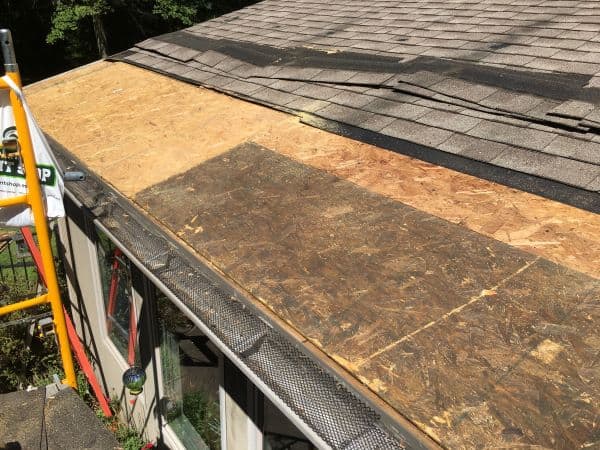
My repair involved replacing nearly the first two feet of a 17’ roofline that was damaged by ice dams. Following the steps above, I removed the shingles the entire length of the roof, removed the bad sheeting, and installed new sheeting. At this point, in many areas, you’d be ready to install the underlayment and begin shingling. However, because I live in Michigan there is one more step to complete first. I need to install an “ice and water shield”.
Drip Edge Installation
Before you begin installing the ice and water shield, or underlayment, we need to look at the correct way to install it with the drip edges. According to my research, you should install the drip edge along the eaves first. Then install the ice and water shield overlapping the drip edge so it’s flush with the bottom edge. That way if moisture gets under the shingles it will run down and off the drip edge.
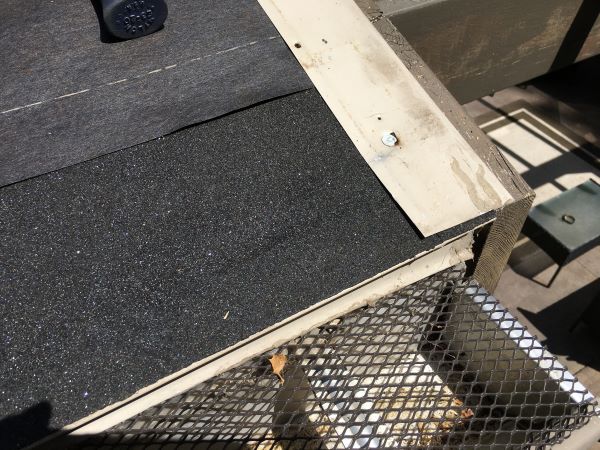
The drip edge along the edges of the roof referred to as the rake edge, goes over the underlayment. This is done so if rain is blown in under the edge of the shingles it will be on top of the underlayment, not under it next to the sheeting. That means you’ll need to remove some of the nails in the rake drip edge so it can be lifted to install the underlayment under the drip edge. At the rake edges, the underlayment should be cut off flush with the sheeting.
How To Install Ice And Water Shield
Ice and water shield is typically a self-adhering waterproof barrier that is required to be installed on certain areas of the roof, depending on where you live and. Ice and water shield is applied directly to the roof sheeting. You can then cover it with the normal underlayment extends up covering the entire roof.
Many northern states require the barrier to protect against ice dams and in states that are subject to hurricane-force winds the barrier is required to protect against wind-driven rain that can get under shingles. In some of these areas, the ice and water shield is installed at the eaves and along the rake drip edges. Some areas require the entire roof to be covered with the barrier. If you’re making a roof repair, check the local building codes to see what is required. As a DIY’er your goal should be to make the best repair you can.
As mentioned earlier, the Michigan code requires installing ice and water shield on the eaves. Our original roof installation didn’t have the ice and water shield installed. I assume it wasn’t required at the time the house was built. This product normally comes in a roll that is 3’ wide, So knowing I would be installing the barrier, I removed 4’ of shingles from my roofline. That gave me plenty of room to install ice and water shield and add another underlayment layer that would tie into the existing underlayment above.
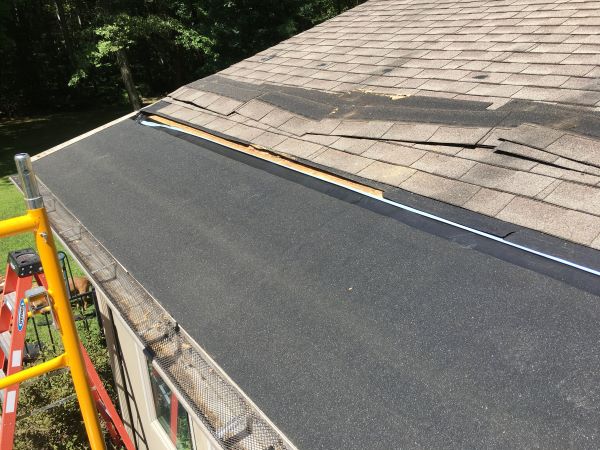
I elected to install my ice and water shield in one 17’ piece. You will definitely need some help if you do it this way. You can install it in smaller pieces, so it’s easier to handle, but you’ll need to overlap the pieces. Be sure to follow the manufacturer’s recommendations on the overlap. If wanted or required by code, you can add a second row of the barrier, overlapping the first. You will just need to remove more shingles and underlayment.
Once you have the barrier positioned in place you’ll need to peel off the plastic coating that covers the adhesive back. The brand I used had to strips, an upper and lower. Firmly press the barrier down, using your hands, the full length. This should be enough to hold it in place as you prepare for the next steps.
How To Install Underlayment
When installing underlayment, or ice and water shield, always start at the lowest point of your repair. Ideally, the underlayment should always be at least 6” underneath the underlayment above it and extend 6” over the underlayment below it. That way any water should run downward. Much like the shingles themselves. Once the underlayment is installed you can reinstall the rake drip edge over the underlayment and the eaves drip edge.
If you’ve made a small repair in the middle of your roof, sometimes getting the proper overlap on the underlayment isn’t possible. In those cases, many of the new synthetic underlayment manufacturers recommend cutting a patch at least 6” larger than the repaired area and using their recommended adhesive to secure it to the existing underlayment. If you’re repairing an older roof using tar paper, I would recommend patching it in much the same way. Cut a large patch and seal it using plenty of roofing tar and use a few staples to hold it in place.
Installing Shingle Starter Strip
Above, in the materials needed section, I explained what a starter strip was and why it’s needed. I chose to use a commercially made starter strip instead of upside-down shingles. The product I used comes in a roll, was 9” wide and self-adhering.
The adhesive on this starter strip was very sticky! So be sure to have it in place and slowly remove the plastic backing as you move along putting it down. As with my ice and water barrier, I chose to install the starter strip in one piece to avoid seams. If you put it down in multiple pieces, you should avoid having the seams of your first course of shingles and the starter strip falling together.
Installing Asphalt Shingles
With all your repairs made, the underlayment and start strip down, and the drip edges in place it’s time to start laying shingles. Because you will be tying into an existing row of shingles I found it useful to do a little “dry fitting” of a few shingles before I nailed them down.
Dry Fitting Shingles Before Nailing
I laid the first course of shingles along the eaves drip edge checking my horizontal spacing. I started with a full shingle on one rake edge and work my way to the other. At the other rake end, you will normally have to cut the shingle to fit, so I wanted to see how big a piece would be needed.
This is important because it’s not a good practice to try and attach 2” or 3” pieces of shingle on the rake edge of a roof. It’s much easier for them to be blown off by high winds. You can adjust this by trimming the last full shingle laid, making the end piece larger.
Another important thing here is to try and keep the shingle seams at least 8” apart. This reduces the change of water getting in. Dry fitting the first course of shingles is also the perfect time to make sure the shingle seams and the starter strip seams do not line up.
The other item I checked while “dry fitting” was the vertical spacing. I did this by laying shingles out along the rake drip edge, overlapping them in the normal fashion, until I reached the existing row of shingles. The goal here is to make sure the newly installed shingles tie into the existing shingles nicely, are evenly spaced all the way down to the eaves, and have the proper overhang on the drip edge.
The overhang should be at least 1/4”, but not more than 3⁄4”. More than that and it’s easier for the wind to catch them and cause damage. This is the perfect time to make the overhang adjustment and to adjust the spacing of the rest of the shingles to match the rest of the roof as closely as possible.
The short video below shows you some of the main things I check before I get started nailing the bulk of the shingles in place. It will help make for a nice looking and effective repair.
Nailing Asphalt Shingles
With the first course of shingles in place, and properly spaced, it’s time to nail them down. The manufacturer will have specific requirements, which typically recommends 5 to 6 nails per shingle. The nails are placed right along the tar line. This is normally the meatiest part of the shingle and should secure it.
The nails and tar line will be covered by the next course of shingles and will be nailed in the same way. The nails in the second course should catch the top inch of the shingle below. This puts 10 to 12 nails in each shingle, which is ideal. I’ve had shingles on a steeper pitched roof come loose and start to slide. I believe the number of nails used and placement played a big role in this problem.
The short video below shows you where you should put the nails and why it makes for a secure installation. It’s so important when dealing with heavy snow loads and high winds. Plenty of nails in the right places are the key.
Before laying the second course of shingle you will need to cut the first shingle in that course so the seams do not line up with the shingles below. The typical shingle is approximately 39” long. Take one shingle and cut 1/3″ of it off (13”) and set it aside. Use the 2/3″ portion of the shingle for the second course and continue on with full shingles. This will stagger the seams by 13”. For the next course, you can start it with the 1/3″ piece set aside.
Seam adjustments will still need to be made at the end of each row. Also once you get to within a couple of rows of the existing shingle line you will want to verify where the seams are in that course. You may need to switch up the use of the 1/3, 2/3 or full shingle usage to keep the proper seam spacing.
Reusing Asphalt Shingles
If you reuse any of the shingles you removed, it is best not to use the old nail holes. Move over about an inch and put in a new nail. You will need to apply a dab of tar patch material to the old hole to seal it up. I highly recommend doing this as you go along installing the shingles. The nail holes are fully visible and easy to get at. It may seem to take a little longer, but you won’t have to go back over the roof trying to find them later. It’s so worth the time spent.
When you reach the final course of shingle they will need to be slide under the existing row of shingles on the roof. You will need to hold the existing shingle up a little so you can nail the shingles in place. Don’t forget that the last row of existing shingles had the nails removed to free the shingle below it. You will need to go along that row of shingles and nail them down. Don’t forget to apply a little tar to the old nail holes too.
Conclusion
That’s all there is to making your own shingle roof water leak repairs. At first, it might seem too big for the average homeowner to make, but as you can see it’s very doable. This roof repair took roughly 10 hours to complete, with minimal help. That included the time it took to document the repair for this article and taking several water breaks and eating lunch. According to the website DIY or Not, the cost to have just a few shingles replaced in my area would be close to $200. I suspect the repair made in this post would cost three or four times that amount.
The best way to avoid costly repairs is to catch issues early! If you have a few shingles damaged by wind, replace them as soon as possible. If you have issues with ice dams, you should make sure you have adequate insulation and proper attic ventilation. On lower pitched roofs removing built-up snow can help with ice dams and reduce the snow load on your roof. Check out our article on safe roof snow removal. It has some safe, practical ways to get snow off your roof.
All these items can save you frustration and expensive repairs, both to the roof and to water-damaged interior walls and ceilings. It’s very important, make those shingle roof repairs today.
If you have any comments or questions, you can leave them in the comments section below or you can email us at [email protected]. FYI, we do not collect or share email addresses. We will only use them to reply to your comments or provide answers to your questions. We are also required to let you know that some of our links are “affiliate links”. This means if you click on a link and make a purchase, we could make a small commission, at no extra cost to you. This helps offset the cost of maintaining our website. So, if you like what you’ve seen, please be sure to give us a “Like” and “Share” on Facebook and Instagram too. Thank you for reading and good luck with all your home projects!

Thanks. For smaller repairs it’s nice to be able to take care of them yourself.
I love the detailed instructions and helpful videos that make the process easier to understand. It’s great to have a resource that shows how to fix leaks and maintain a roof without needing professional help.
I’m so glad it helped!
This is such a helpful walkthrough, thank you! We were roofing for my mom’s house and used this a lot. One thing we forgot about was getting a roofing dumpster rental before we started and we quickly realized we needed to get one! I would just add to not forget that, ha!
Thank you for sharing such helpful content!
Thank you for your encouraging comments! As for the leaf guard question, my research, and experience, indicates this is one of those “double-edged sword” questions. I live in a wooded area of Michigan and without the gutter guards, I would be cleaning my gutters weekly in the fall. The reality of it is that regardless of guard or no guard the gutters typically fill and freeze during the winter months anyway. So that definitely gives the homeowner one more area to keep an eye. Without gutters the rain running off your roof for the remaining 8 or 9 months can cause foundation and/or basement issues. Those are the lesser of two evil choices we all must make. As for ice dams, the best prevention is making sure your addict is well insulated and use a roof rake to keep the snow from accumulating. Good luck, winter is right around the corner!
Very well covered repair – and yes you would have easily paid 4 times that if hiring it done. One thing I always wondered was how much effect does leaf guards have in assisting ice dam formations!